Friday, June 26, 2009
Just kidding
I was just kidding that I will always wear a mask. I want to follow Wasil and Amin. They are brave enough to not wear a mask.
Thursday, June 25, 2009
Finally...
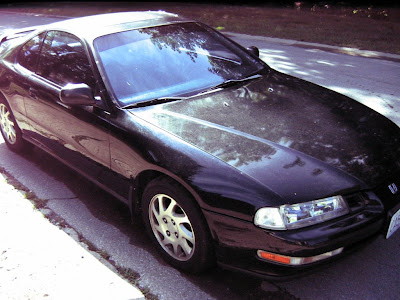
I bought a car.
 1994 Honda Prelude VTEC $1800.00
Mileage: 190,000 miles
Excellent mechanical condition, engine does not leak nor burn any oil. Mechanically speaking there are no issues. Body has usual Honda rust, and the front left fender needs replaced (hit and run @ parking lot - a pickup truck backed into it). To-dos: New set of front tires, oil change after 100 miles, and treat the leather!

 - Turning Diameter, Curb-to-Curb (ft.): 35.9
Exterior Dimensions
Specs
- Leather
- Granada Black Pearl NH-503P
- 58% front and 42% rear weight distribution
- 4-wheel power-assisted disc brakes with ABS
- 5-speed manual transmission
- Driver and passenger front airbags
- 7-speaker audio system (stock)
- Directional, nine spoke alloy 15-inch wheels (~15 lbs)
- Electro-luminescent gauge displays
- Suspension: 4-Wheel Upper Wishbone, Lower Control Arm- Stabilizer Bar (mm, front/rear): 25.4/23.0
- Steering Type: Variable-Assist Power Rack-and-Pinion
- Steering Type: Variable-Assist Power Rack-and-Pinion
- Steering Wheel Turns, Lock-to-Lock: 2.9
- Turning Diameter, Curb-to-Curb (ft.): 35.9 Exterior Dimensions
- Wheelbase (in.): 100.4
- Length (in.): 174.8
- Length (in.): 174.8
- Width (in.): 69.5
- Height (in.): 50.8
- Track (in., front/rear): 60.0/59.6
- Ground Clearance (in.): 5.7
- Curb Weight (lbs., MT): 2932
- Coefficient of Drag (Cd): .33
- Type: Aluminum-alloy in-line 4
- Height (in.): 50.8
- Track (in., front/rear): 60.0/59.6
- Ground Clearance (in.): 5.7
- Curb Weight (lbs., MT): 2932
- Coefficient of Drag (Cd): .33
Engine
- Type: Aluminum-alloy in-line 4
- Displacement: 2157 cc
- EPA Estimate: 22/26 mpg
- Horsepower@rpm (SAE net): 190@6800
- Torque (lb.ft.): 158@5500
- Compression Ratio: 10.0:1
- Valve Train: 16-Valve DOHC VTEC
- Fuel Induction System: PGM-FI
- Ignition System: Electronic
Interior Dimensions
- Headroom (in., front/rear): 38.0/35.1
- Legroom (in., front/rear): 44.2/28.1
- Shoulder Room (in., front/rear): 54.0/50.6
- Hiproom (in., front/rear): 52.2/41.4
- Cargo Volume (cu. ft.): 7.9
- Interior Volume (cu. ft.): 80.2
Capacities
- Fuel (gal.): 15.9


- Torque (lb.ft.): 158@5500
- Compression Ratio: 10.0:1
- Valve Train: 16-Valve DOHC VTEC
- Fuel Induction System: PGM-FI
- Ignition System: Electronic
Gear Ratio
1 - 3.307
2 - 1.950
3 - 1.360
4 - 1.071
5 - 0.870
FD 4.266
2 - 1.950
3 - 1.360
4 - 1.071
5 - 0.870
FD 4.266
Interior Dimensions
- Headroom (in., front/rear): 38.0/35.1
- Legroom (in., front/rear): 44.2/28.1
- Shoulder Room (in., front/rear): 54.0/50.6
- Hiproom (in., front/rear): 52.2/41.4
- Cargo Volume (cu. ft.): 7.9
- Interior Volume (cu. ft.): 80.2
Capacities
- Fuel (gal.): 15.9

Wednesday, June 24, 2009
"Knew Editir"

I must first thank Amin for inviting me to be an editor for this glamorous blog. I have not paid back his generosity by adding some awesome posts to this blog just yet, for I have not had the opportunity to "to waste his [my] time contributing" as my colleague (Amin) has mentioned. I will not wear a mask and a hat to show that I am a editor; I feel entirely confident with my natural look. I don't care if anyone knows my true identity, but I agree that "you can never be to (sic) careful."
~Wasil
Tuesday, June 23, 2009
Meet Dz

Hey (below), welcome to my little corner! Our new editors should make this blog a bit less boring. Although for sure Wasil will never going to waste his time contributing, I'm sure these new facetious editors will.
Meet Dz, my new adopted brother. Since my brothers are so far away, I need someone here locally to pick on and practice my superiority. Wahahahaha!
I like St. Louis, one of my favorite cities to date. The Gateway St. Louis arch looks like that mysterious planet in Halo. Pretty amazing, definitely one of the 'must-see' landmarks in the USA. Only thing that can top this, so far, is the Niagara Falls and the Petronas Tower. Did I mention there's this shop that has Halal Philly Cheese Steak?! Hell yeah!
Its L-man

Well first I must thank Amin for inviting me to this luxurious blog. I will pay back his generosity by adding some awesome posts to this blog. I will wear a mask and a hat to show that I am a editor. None shall know my true identity! MUWAHAHAHAHAHAHAHAHA!!!
New Editer
Hi, I am a new editor for this glamorous blog. First I would like to thank Amin, who invited me to this blog. I will pay you back with my very interesting posts
As you know, I would not want to show my identity to the world, so I will always be wearing a mask. You can never be to careful.

Ok, this is just a heads up. Cool.
Monday, April 27, 2009
Cleaner Air
Do you know that some cars have a cabin air filter? This filter is just for your air circulation and conditioning system in the car. Yes, it's the air you breathe inside the car. It is recommended that the air filter is changed every 7,500 miles or 6 months. It probably lasts much longer and you can tell when it is going bad once you smell the mildew and mold after a wet, humid day. It is also time to change when your windows tend to fog up quicker than normal and your A/C just doesn't seem that cold anymore.
We (Aishah and I) are using two cars. I did some research and what I found is interesting.
The 2007 Subaru Impreza does have one located behind the glove box. It takes about 9 or so screws to expose the filter. A replacement filter is only obtainable through the dealer for an enormous price of $70.
The 2004 Ford Focus has a spot for one, but apparently in the USA it does not come with a filter installed. Oh why does the Europeans get better Fords than the U.S.? The filter however is available OEM for as low as $15 dollars. Now I really wish that I knew about this sooner, it's about 70,000 miles and 6 years too late! It'd serve my dad really well with his 2hr commute...
For the Ford Focus, I bought the replacement filter at Wal-Mart. They don't have the cheaper Purolator $15 part, but they do have a more expensive FRAM with Arm & Hammer odor protection for $30. I figure it is a good investment for a better overall health - and it should help a lot with Aishah's seasonal allergies. Changing the part doesn't require much - about 5 tabs later, the filter area is accessible. Interestingly, in the bay area where the filter is, I found a rat nest! It's about the same size if not bigger than the rat's nest I found on my Prelude in 2004! No wonder the car has been smelling rather 'interestingly' in the past especially when its wet and humid out! My money on the same field rat that was in the Prelude. I sold the prelude to a good friend of mine in 2006, the rat probably needed a new home and moved to the Focus.
For the Subaru Impreza, the car do come with a filter, but wasn't touched until now. It has been about 2 years that the filter hasn't been replaced. As expected, the filter has dusts/mold/junk trapped. Glad we're not breathing that anymore! To replace the stock filter, I did not buy the official filter from the dealer. Instead, as per guides online, I bought a Filtrete 1500 Home Filter to be cut and then used inside the Subaru. It costs $30, but I get 6 filters out of it. That amounts to about 3-4 years worth of supply! Beats spending $70 + labor to have it replaced at the dealership! The filter has the finest pores, even finer than the official ones. Hopefully this will reduce the mildew smell that sometimes present in the car. This is probably because the car is always in the basement garage, used 1-2 times a week. Hopefully this will also help reduce allergies that sometimes bug Aishah after a long trip in the car.
Finally, a step toward a healthier life!
Thursday, March 19, 2009


Sunday, March 15, 2009
IHS EV Project (part 2)
Software and Code:
Source codes: ihsEVMain.txt, ihsEVMotor.txt
Specifications: EVcompetitionRules (pdf), arduino-duemilanove-spec (pdf), arduino-duemilanove-schematics (pdf), Hbridge-sn754410-spec (pdf)
Arduino tutorial: I highly suggest you visit this site and spend a couple hours with the activities
Arduino Development Environment Setup:
- Head to Arduino's download page and get your favorite client (we are demonstrating the Mac OS X 0014 client below)
- Install/unzip

- Open the application (Vista users need to run the .bat file)

- RENAME the first tab to: ihsEVMain


- Create a new tab and name it: ihsEVMotor


- in ihsEVMain tab, paste in the code from ihsEVMain.txt

- in ihsEVMotor tab, paste in the code from ihsEVMotor.txt

- Click on the play button to verify the code

- If you see "Binary sketch size: 3756 bytes (of a 14336 byte maximum)", congratulations! If not you need to re-copy/paste the source code.
- Click on the save button to save your work. This is important to do often!

- Once the EV is hooked up via USB, you can upload the code

- HAVE FUN!
IHS EV Circuit here (pdf, quick and dirty Word mock-up)
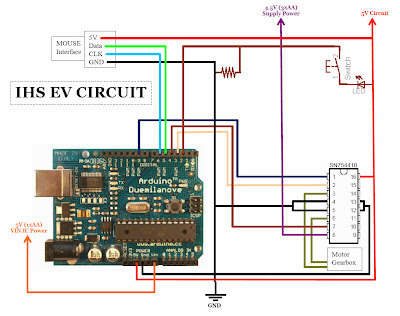
Hope this helps and will aid in better understanding of the EV car concept in general. The code ihsEVMotor shouldn't be touched, and the only variables that we want to customize is in ihsEVMain. Those variables are int trackLength, and int rollingStop. Remember we not only want a perfect stop distance wise, we want the time of running to be precise also.
BONUS: This video is on the little LED lights counting down to launch, inspired by "The Dragster" in Cedar point. If you look closely, I first pressed the pushbutton on the Arduino micro-controller to reset the board. Then I pressed the pushbutton on the breadboard to start the EV. At the competition, a dowel rod should be used for the 2nd button. Enjoy!
Saturday, March 14, 2009
IHS EV Project
This is done to help Indiana High School, my brother and his friends. IASD has served me very well and I think this is a good way to give back a little. IHS lacks a thorough electrical, micro architectural classes; the closest they have is Computer Science, which is good, but not entirely great for building circuitries required for this EV. Thank you Mrs. Baker for your hard work.
Lets get to the topic. This is the package sent to Wasil on Wednesday, March 14th, 2009.

The box contains a complete vehicle, but disassembled. The vehicle body was made with parts around the house including aluminum holiday container (previously contained assorted nuts), and couple smaller aluminum boxes that contained a wallet, and a B.U.M. watch i got back in 1997 (or so). The vehicle was heavy, about 3 lbs, but functional nevertheless.

The reason I did a prototype was 1) I needed to know what kind of logic is the most effective and 2) Something for the team to have as a backup plan (risk mitigation). The reason for 1) is that even though on paper and in pictures the car works perfectly, it doesn't mean that it will when it comes to realization.

For example, I planned to use 2xC batteries for the motor and the other 2xAA batteries for the Arduino microcontroller. It turns out that the H-bridge that I was using takes in 3V but outputs less than desired voltage to the motor (1.9V under load). The H-bridge spec calls for 4.5V minimum motor supply input for a good output. I guess the H-bridge logic for the motors has several resistances that lowers the overall output. So to fix this I had to use 3xAA (4.5V) for the motor and 1xAA for the microcontroller. I couldn't use the C batteries because I only have a battery case for 2xC, and 3xCs would be heavier than I would have liked. I also had to jerry-rigged the battery holders to fit 3xAAs together (picture below).

Be careful with the batteries. One wrong side, or connection, can be detrimental. So look twice before plugging things in, and if you're not sure look at these pictures. I also incorporated a switch to turn on, and off the batteries (picture below).

Note: For the microcontroller battery (1xAA), if you're not running the vehicle on the track, please take out the battery. Since it has a built in 5V regulator, it will drain the battery regardless of usage (picture below). This battery also is modded to only take ONE battery at one side. Failure to do so will burn your fingers off (true story!).

For testing on the computer, the USB cable provides sufficient power to the microcontroller. To test out the motor with USB, you will still need the motor supply (3xAA).
Power connections:
5V IN IC (Red wire from 1xAA battery) connects to the 'Vin' port on the microcontroller (picture below).

4.5V Supply (Red wire from 3xAA batteries) connects to the #8 leg VCC2 of the SN754110 IC on the breadboard. It does NOT go anywhere else (pictures below). Spec sheet here (pdf).


Ground (Black wire from the switch) connects to the grounding strip on either side of the bread board where most black wires are hooked up (picture highlight below).
This concludes the introduction to the EV, and how to connect them. Make sure the switch is OFF before connecting/disconnecting any wires! Stay tune for an update on the software side of things. In the meanwhile, check out the video below.
Subscribe to:
Posts (Atom)